Creating a Razor Page
In Blazor, pages are rendered using Razor Components, which are the canvas that your application will be built from. In this section, we will cover the setup of a Razor page that can make use of generated classes to render content from the datbase.
-
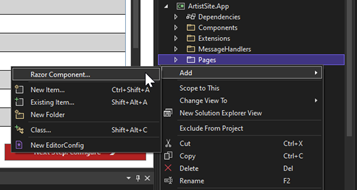
Right click on the "Pages" folder of your .App project, hover over "Add" and click on "Razor Component" at the top of the dropdown.

- Give this new Razor Component a name like "ListMedia" - We'll make a page that lists the Medium categories from the Database, which a user can then access to see the Art inside that Medium.
-
Clear all the markup initially present on the page, including the "@code" block at the bottom. In their place, add this line at the top of the page:
- @page “/Media”
- Add a class inside this same folder, and give it a matching name - However, give it the extension of ".razor.cs", which will nest it underneath your Razor Component in Visual Studio. This class will act as your Viewmodel, and contain your code separately from the Razor page markup.
- You will notice that the name of this class has error-markings on it due to its matching name. Append "ViewModel" onto the end of the name to resolve this conflict and describe this class's utility.
-
Assign this Viewmodel class the included "BaseViewModel" class as its parent - This class is intended to hold any common Properties or Logic that you may use throughout pages of your application, following normal C# inheritance. If Visual Studio claims it cannot be found, hover the Caret over the name and tap "Alt+Enter" to quickly add the Namespace containing it.
- MSC.ArtistSite.App.ViewModels, if you created your project with the same name as us.
-
Finally, back on your Razor page, add this line below to have your Razor page make use of the Viewmodel class - Assuming you have named yours ListMedia like our example:
- @inherits ListMediaViewModel
Preparing ListMedia
With your Razor Component page for ListMedia created, there are a few more setup steps that will need to be taken in order to display content from the ArtistSite database on it. First, you need to inject the WebApiDataService in order to access your API; And second, your Viewmodel needs to be able to retain this transferred data in memory.
Injecting the WebApiDataService
- Under the ViewModels folder of the .App project, open the BaseViewModel class, which your ListMediaViewModel inherited from.
-
Within, add a public property of the interface of your WebApiDataService, with a name matching that of the implementation name
- public IWebApiDataServiceAS WebApiDataServiceAS { get; set; }, if you used the same values in CodeGenHero.
-
Above this Property, add the "Inject" attribute in brackets. This will let the dependency injection framework inject the Implementation you registered with it in the previous section.
- [Inject]
- From the namespace Microsoft.AspNetCore.Components
Using the WebApiDataService
- Back in your ListMediaViewModel, add an IList property of Medium, and a using statement for your DTO namepace.
-
Next, create this override method in your class - This hooks into the Razor Page Lifecycle, detailed in Microsoft's documentation here.
- protected override async Task OnInitializedAsync()
- This, as the name suggests, is an Async method ran when the component is initialized by the Razor view engine.
-
Within that method, assign your Medium List property to equal an Awaited call to the method GetAllPagesMediaAsync from your WebApiDataService.
- Media = await WebApiDataServiceAS.GetAllPagesMediaAsync();
- If desired, you can also add navigation breadcrumbs to your page, based off MudBlazor's breadcrumb framework, which we have done in our sample project.
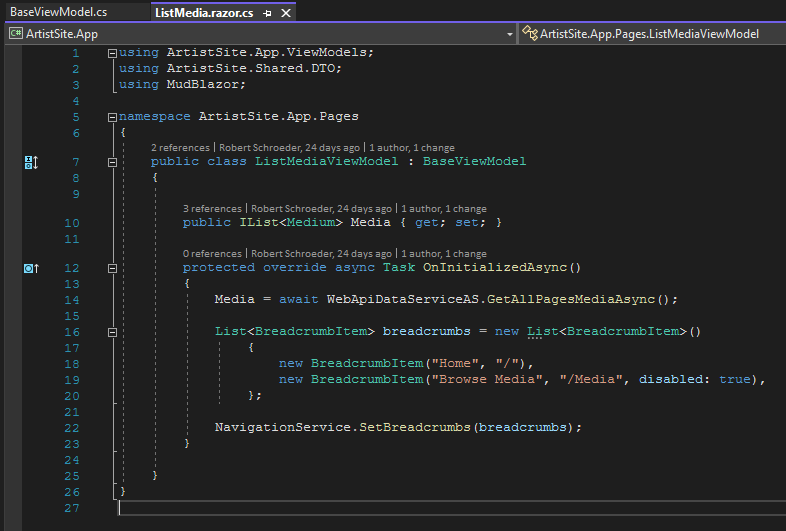
- When you are done, your ViewModel class might look something like this:

Implementing the Page Markup
With your Viewmodel squared-away, you can now design your actual HTML page to consume data from your source database. We'll create a basic implementation here that quickly demonstrates the concept.
-
Below your directives, add a Header to your page - This can be a standard HTML Header, or a MudBlazor text component set to a Header type.
In that, give your page a name that describes it, like "Browse by Media".
- <MudText Typo="Typo.h3">Browse by Media</MudText>
- As data from a database is loaded Asynchronously, you need to build your pages to be null-safe while this data is awaited. Out of the box in Blazor, this can take the form of boilerplate null-checks surrounding blocks of markup.
- To simplify this, this template provides a component called "LoadingMask". Using Components in Blazor follows the same practice as normal HTML tags, and in function your Components effectively become custom HTML tags following the same syntax as vanilla HTML.
-
Below your header, add the tag for LoadingMask, and assign its WaitFor parameter to your Media List.
- <LoadingMask WaitFor="Media">
- Within, create a list (Ordered or Unordered, whichever is preferred).
- Next however, instead of creating a <li> list-item, place an @ sign to transition your Razor page from HTML to C#, and follow it with a Foreach loop block that will iterate your retrieved Media.
-
Within each iteration, create an HTML List Item, and access the name of your iterated Medium using the @ character to access the C# object while inside the HTML tag.
- <li>@medium.Name</li>
-
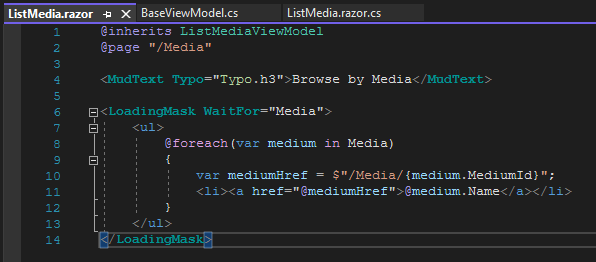
After the above steps (And any custom additions, such as later adding in links), your ListMedia page may look something like this:

- As a note in advance, when you transition this simple text-readout to links later, like in the example image above, note that you cannot interpolate strings inside of tag parameters. You will need to declare these as variables inside a code-block beforehand and pass them into the parameters.
Adding navigation to the ListMedia page
- In the Shared folder of the .App project, open "MainLayout.razor".
- Within, look for the tag <MudNavMenu> nested inside.
-
Inside, add a nav link following the same pattern as the pre-provided Index nav link:
- <MudNavLink Href="/Media">Browse by Media</MudNavLink>
- As your Navigation grows more complex (And possibly data-driven), you may want to consider breaking out your navigation section of your layout, and possibly the entire Drawer, into its own component, in order to avoid bloating your Layout.
